Showing posts with label Blogging tips. Show all posts

Friday, July 3, 2015

How to Add Google Analytics in Blogger

How to Add Google Analytics in Blogger.

Google Analytics also can be added to blogger…analytics is a great tool for blogger for managing and get real time report related to traffic and visitors.
Analytics can be linked to google AdSense, webmaster tools, so you can get more effective data of your bloggers blog.
Setting up google analytics to blogger is quite easy.
Here is simple steps on How to Add Google Analytics in Blogger:-

1.login to your Gmail account…after login search the Google for google analytics.

2.Now signup for Google Analytics.


3.Under new account fill the given  information
In “What would you like to track?” select website.
In “Setting up your account” give account name..
In “Setting up your property” give Website Name..
Select “Industry Category”
Fill up time zone also.
In “Data Sharing Settings”, mark all the boxes.


4.Now click on Get tracking ID.
Accept terms and conditions.

5.Now you will be directed to the Admin page..from here copy  Tracking ID.


6.now login to Blogger. Go to Setting>>other.
Under Google Analytics.
In Analytics Web Property ID paste the copied code and save the settings.


7.Now  Go to the page from where the Tracking ID was copied,Copy the javascript code which is given just below the line  “This is your tracking code. Copy and paste it into the code of every page you want to track.

8.Again go to blogger and click on template and then on Edit HTML.


9.Now just click in HTML code and press ctrl+f and type </head> and press enter.
Just above </head> paste the JavaScript code that we copied earlier.

10.Save the  template.

You are almost done here you have successfully added the tracking code to your blogger.  


From here you have to wait for 24hr to get data on google analytics.

Friday, June 26, 2015

How to Add Google Analytics to your blog or website.

How to Add Google Analytics to your blog or website.


Google analytics is a great tool provided by Google as a free service for Gmail account holders.Google analytics provides detail information on what is going on your website or blog.
Google analytics can monitor real-time website activities like real time visitors on you site,location of visitors, content viewed, traffic sources, from where the traffic to your site is coming.
Other features like Intelligence Events, Audience, Acquisition, Behavior, Conversions. Totally free from google.
Analytics can provide many useful information about your site…and you can get track of your site.
You can also link your webmaster tools,adwords,adsense accounts to google analytics.
First thing to do in order to add analytics to your site or blog is to add a tracking code.
There are two basic methods are mentioned by google:

Add tracking using Google Tag Manager [Universal method to add Analytic to blog or website]

To add tracking code to your website you have to create a Google tag manager account..


1.Go to Google tag manager and signup.


2.Fill your account name..and check the check box below it if you want to improve your Analytics data.

3.Give a container names...cotainer is important because " A container holds all the tags for a specific website, so it’s best to name the container after the site. For the site example.com, you might name the container "example""-google

container contains google analytics tag,adword tag, etc.

4.Now click on creat..
Accept all terms...and click on yes....

5.Copy and paste this snippet immediately after the opening <body> tag on every page on the site.

Now you have done adding Tag manager code to verify your website on Analytics account.

Add the tracking code directly to your site [easy mothode]

1.Log in to your analytics account.

2.Then go to admin…select property, from dropdown menu and create a new property.

-Give website name and website URL.

-Select the industry type .i.e website type.

-Add Reporting Time Zone.

-And click on get tracking ID.


3.Now you will be directed to Administration panel. From there click on tracking ifo and click on Tracking code.


4.Now copy the tracking code which is java script and paste it in <head> tag of your websites HTML code.
Now you are almost done. If you want to edit extra setting like AdWords linking, AdSense linking.you can do it now from there.


After placing Analytics code you have to wait for 24hrs to get real-time data.


Thursday, June 25, 2015

How to Divide Column in Blog Post

How to Divide Column in Blog Post

How to Divide Column Articles Post - Actual column, in an ordinary article you write can be divided into two columns even more.The column that divided this article we often see in a newspaper or magazine media.

Here I will give you a few tips to take advantage of column-width CSS code Property.Terlebih first please apply the code below on the template.


1. Go to your blogger dashboard>> Template>> Edit Template

  2.Hit Ctrl+F and find ]]></b:skin> and past the following code before ]]></b:skin>


.bagidua
{
   -webkit-column-count: 2;
    -moz-column-count: 2;
    column-count: 2;
}
In the above code, the value of column-count me give you two are meant article posts will be divided into two columns. If you want some columns eg 3 columns then specify a column-count value with the number 3.

Save template.Kemudian to the application on the post, please copy and wrap your article with the HTML code below.

HTML#1

<Div class = 'bagidua'> APPLY YOUR TEXT HERE </ div>

HTML#2

<Div class = 'bagidua'> Donec at dolor mi. Pellentesque ornare sit amet risus. Fusce ut turpis sed semper varius. In ut est et interdum gravida nec enim id quam. Leo Aliquam ante, suscipit id posuere et, varius quis Metus. Aenean tincidunt pellentesque facilisis. Maecenas iaculisntesque ante, mass velfaucibus iaculis eget. Suspendisse potenti. Quisque auctor, turpis ut auctor tempus, silent ante pharetra dui, eleifend posuere Tellus Metus et lorem.Class aptent taciti sociosqu ad litora torquent per conubia nostra, per inceptos himenaeos. </ Div>

Save the templete and Then see the result.


Blogger Redirection Code to redirect your site to .com domain

Blogger Redirection Code to redirect your site to .com domain.


Argentina [blogspot.com.ar]
Australia [blogspot.com.au]
Brazil [blogspot.com.br]
Canada [blogspot.ca]
Czech Republic [blogspot.cz]
France [blogspot.fr]
Germany [blogspot.de]
Hong Kong [blogspot.hk]
India [blogspot.in]
Italy [blogspot.it]
Japan [blogspot.jp]
Mexico [blogspot.mx]
New Zealand [blogspot.co.nz]
Portugal [blogspot.pt]
Romania [blogspot.ro]
Spain [blogspot.com.es]
Sweden [blogspot.se]
UK [blogspot.co.uk]

The blogger redirect code where you can redirect your local site to international .com domain for example example.blogspot.com will redirect to.com.au in australia and so on , this is the big problem for sites with good page rank and alexa  rank. Now here is the best code for the blogger.

Code #1

<script type="text/javascript">
var blog = document.location.hostname;
var slug = document.location.pathname;
var ctld = blog.substr(blog.lastIndexOf("."));
if (ctld != ".com") {
var ncr = "http://" + blog.substr(0, blog.indexOf("."));
ncr += ".blogspot.com/ncr" + slug;
window.location.replace(ncr);
}
</script>

Best code..

Code #2

<script type='text/javascript'> var str= window.location.href.toString(); if ((str.indexOf('.com/'))=='-1') { var str1=str.substring(str.lastIndexOf(".blogspot.")); if (str1.indexOf('/')=='-1') { var str2=str1; } else { var str2=str1.substring(0,str1.indexOf('/')+1); } window.location.href =window.location.href.toString().replace(str2,'.blogspot.com/ncr/'); } </script>


Wednesday, May 6, 2015

How to creat a Browser for your Blog..

How to creat a Browser for your Blog..


Some time we find that the post on our blog is too much to handle..and finding them page by is such a pain..Its also beneficial for our blog visitors that they can find any post easily without messing up with the contents just like we add a search bar in blog we can add a browser for browse the post related to specific topic...

Here is how to do this,step by step

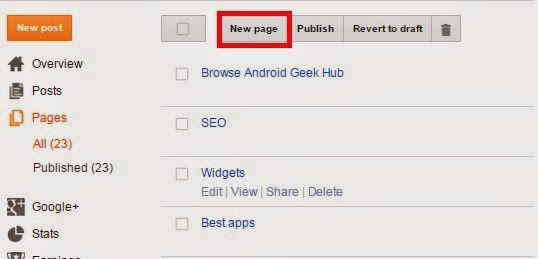
1.Go to the Pages and create a new page.


2.Then Slect New page.


   3.In new page select HTML and select the text inside the page and Delete them. Remeber that after deleting the text dnt go to Compose...


4. Now copy and paste code given blewo in HTML tab..

<div id="table-outer">
<table><tbody>
<tr><td><label>Sort posts by : </label></td><td><select id="orderFeedBy"><option selected="" value="published">New post</option><option value="updated">Post updated</option></select></td></tr>
<tr><td><label>Filter posts by category : </label></td><td><span id="labelSorter"><select disabled=""><option selected="">Loading...</option></select></span></td></tr>
<tr><td><label>Search by keyword : </label></td><td><form id="postSearcher">
<input type="text" /></form>
</td></tr>
</tbody></table>
</div>
<header id="resultDesc"></header>
<ul id="feedContainer"></ul>
<div id="feedNav">
Loading...</div>
<script src="https://arlina-design.googlecode.com/svn/tocs.js" type="text/javascript"></script>
<style scoped="" type="text/css">
#comments {display:none;}
</style>

5.Now Give a Title to the page....anything you wish and publish the page..

6.Now go to layout


 7.Select widgets and add pages...


8.Select the page that we have created earlier and save it...


9.All Done....!!


Note that the Category In the Browser is determined by the tages that you have on your blog..
The tags on blog are shown in Category


Monday, May 4, 2015

How to add Multi Responsive Dropdown Menu in Blogger

How to add Multi Responsive Dropdown Menu in Blogger


In building a menu elements of the first steps we need is HTML

<nav>
<a id="resp-menu" class="responsive-menu" href="#"><i class="fa fa-reorder"></i> Menu</a>   
   <ul class="menu">
   <li><a class="homer" href="#"><i class="fa fa-home"></i> HOME</a>
   <ul class="sub-menu">
   <li><a href="#">Sub-Menu 1</a></li>
   <li><a href="#">Sub-Menu 2</a></li>
   <li><a href="#">Sub-Menu 3</a></li>
   <li><a href="#">Sub-Menu 4</a></li>
   <li><a href="#">Sub-Menu 5</a></li>  
   </ul>
   </li>
  <li><a  href="#"><i class="fa fa-user"></i> ABOUT</a></li>
  <li><a  href="#"><i class="fa fa-camera"></i> PORTFOLIO</a>
  <ul class="sub-menu">
   <li><a href="#">Sub-Menu 1</a></li>
   <li><a href="#">Sub-Menu 2</a>
    <ul>
    <li><a href="#">Sub Sub-Menu 1</a></li>
    <li><a href="#">Sub Sub-Menu 2</a></li>
 <li><a href="#">Sub Sub-Menu 3</a></li>
    <li><a href="#">Sub Sub-Menu 4</a></li>
 <li><a href="#">Sub Sub-Menu 5</a></li>
    </ul>
   </li>
     <li><a href="#">Sub-Menu 3</a>
    <ul>
    <li><a href="#">Sub Sub-Menu 1</a></li>
    <li><a href="#">Sub Sub-Menu 2</a></li>
 <li><a href="#">Sub Sub-Menu 3</a></li>
    <li><a href="#">Sub Sub-Menu 4</a></li>
 <li><a href="#">Sub Sub-Menu 5</a></li>
    </ul>
   </li>
   </ul>
  </li>
  <li><a  href="#"><i class="fa fa-bullhorn"></i> BLOG</a></li>
    <li><a  href="#"><i class="fa fa-tags"></i> CATEGORIES</a>
  <ul class="sub-menu">
   <li><a href="#">Sub-Menu 1</a></li>
   <li><a href="#">Sub-Menu 2</a>
    <ul>
    <li><a href="#">Sub Sub-Menu 1</a></li>
    <li><a href="#">Sub Sub-Menu 2</a></li>
 <li><a href="#">Sub Sub-Menu 3</a></li>
    <li><a href="#">Sub Sub-Menu 4</a></li>
 <li><a href="#">Sub Sub-Menu 5</a></li>
    </ul>
   </li>
     <li><a href="#">Sub-Menu 3</a>
    <ul>
    <li><a href="#">Sub Sub-Menu 1</a></li>
    <li><a href="#">Sub Sub-Menu 2</a></li>
 <li><a href="#">Sub Sub-Menu 3</a></li>
    <li><a href="#">Sub Sub-Menu 4</a></li>
 <li><a href="#">Sub Sub-Menu 5</a></li>
    </ul>
   </li>
   </ul>
  </li>
  <li><a  href="#"><i class="fa fa-envelope"></i> CONTACT</a></li>
  <li><a  href="#"><i class="fa fa-sitemap"></i> SITEMAP</a></li>
  <li><a  href="#"><i class="fa fa-exclamation-triangle"></i> DISCLAIMER</a></li>
  </ul>
  </nav>

The menu at the top is still a pure HTML and if you want to create a menu that works well and looks to be more attractive then the next step we need is the addition of CSS and jQuery function. Here's the code CSS and jQuery .

CSS

not {
    display: block;
    margin-top: 100px;
    background: #374147;
}

.menu {
    display: block;
}

.menu li {
    display: inline-block;
    position: relative;
    z-index: 100;
}

.menu li:first-child {
    margin-left: 0;
}

.menu li a {
    font-weight: 600;
    text-decoration: none;
    padding: 20px 15px;
    display: block;
    color: #fff;
    transition: all 0.2s ease-in-out 0s;
}

.menu li a:hover,.menu li:hover>a {
    color: #fff;
    background: #9ca3da;
}

.menu ul {
    visibility: hidden;
    opacity: 0;
    margin: 0;
    padding: 0;
    width: 150px;
    position: absolute;
    left: 0px;
    background: #fff;
    z-index: 99;
    transform: translate(0,20px);
    transition: all 0.2s ease-out;
}

.menu ul:after {
    bottom: 100%;
    left: 20%;
    border: solid transparent;
    content: " ";
    height: 0;
    width: 0;
    position: absolute;
    pointer-events: none;
    border-color: rgba(255, 255, 255, 0);
    border-bottom-color: #fff;
    border-width: 6px;
    margin-left: -6px;
}

.menu ul li {
    display: block;
    float: none;
    background: none;
    margin: 0;
    padding: 0;
}

.menu ul li a {
    font-size: 12px;
    font-weight: normal;
    display: block;
    color: #797979;
    background: #fff;
}

.menu ul li a:hover,.menu ul li:hover>a {
    background: #9ca3da;
    color: #fff;
}

.menu li:hover>ul {
    visibility: visible;
    opacity: 1;
    transform: translate(0,0);
}

.menu ul ul {
    left: 149px;
    top: 0px;
    visibility: hidden;
    opacity: 0;
    transform: translate(20px,20px);
    transition: all 0.2s ease-out;
}

.menu ul ul:after {
    left: -6px;
    top: 10%;
    border: solid transparent;
    content: " ";
    height: 0;
    width: 0;
    position: absolute;
    pointer-events: none;
    border-color: rgba(255, 255, 255, 0);
    border-right-color: #fff;
    border-width: 6px;
    margin-top: -6px;
}

.menu li>ul ul:hover {
    visibility: visible;
    opacity: 1;
    transform: translate(0,0);
}

.responsive-menu {
    display: none;
    width: 100%;
    padding: 20px 15px;
    background: #374147;
    color: #fff;
    text-transform: uppercase;
    font-weight: 600;
}

.responsive-menu:hover {
    background: #374147;
    color: #fff;
    text-decoration: none;
}

a.homer {
    background: #9ca3da;
}

@media (min-width: 768px) and (max-width: 979px) {
    .mainWrap {
        width: 768px;
    }

    .menu ul {
        top: 37px;
    }

    .menu li a {
        font-size: 12px;
    }

    a.homer {
        background: #374147;
    }
}

@media (max-width: 767px) {
    .mainWrap {
        width: auto;
        padding: 50px 20px;
    }

    .menu {
        display: none;
    }

    .responsive-menu {
        display: block;
        margin-top: 100px;
    }

    not {
        margin: 0;
        background: none;
    }

    .menu li {
        display: block;
        margin: 0;
    }

    .menu li a {
        background: #fff;
        color: #797979;
    }

    .menu li a:hover,.menu li:hover>a {
        background: #9ca3da;
        color: #fff;
    }

    .menu ul {
        visibility: hidden;
        opacity: 0;
        top: 0;
        left: 0;
        width: 100%;
        transform: initial;
    }

    .menu li:hover>ul {
        visibility: visible;
        opacity: 1;
        position: relative;
        transform: initial;
    }

    .menu ul ul {
        left: 0;
        transform: initial;
    }

    .menu li>ul ul:hover {
        transform: initial;
    }
}

@media (max-width: 480px) {
}

@media (max-width: 320px) {
}

jQuery

$(document).ready(function(){
 var touch  = $('#resp-menu');
 var menu  = $('.menu');

 $(touch).on('click', function(e) {
  e.preventDefault ();
  menu.slideToggle();
 });

 $(window).resize(function(){
  var w = $(window).width();
  if(w > 767 && menu.is(':hidden')) {
   menu.removeAttr('style');
  }
 });


});


How to Add Spoiler or HideShow Button in Blogger

How to Add Spoiler or HideShow Button in Blogger


First, go to blogger> Templates> Edit HTML> Apply CSS code below before </ style> or ]]> </ b: skin> and to apply jQuery code before the </ body>

CSS

#flippy { text-align: center; } #flippy button { background: #aa65c7; color: #fff; text-align: center; margin: 0 auto; border: none; border-radius: 3px; padding: 8px 16px; margin: 10px auto; font-size: 14px; font-weight: bold; box-shadow: 0px 3px 0px 0px #883da7; vertical-align: middle; cursor: pointer; text-shadow: 0 1px rgba(0, 0, 0, 0.3); transition: background 0.1s ease-in-out; } #flippy button:hover, #flippy button:focus { background: #9e4fbf; outline: none; } #flippanel { padding: 1px; text-align: left; background: #f5f5f5; border: 0px; } #flippanel { padding: 24px; display: none; }

jQuery

<script> $(document).ready(function() { $("#flippy").click(function() { $("#flippanel").slideToggle("normal"); }); }); </script>


Monday, April 27, 2015

How to change width of Posts, Body and Sidebar in Blogger


How to change width of Posts, Body and Sidebar in Blogger


Normally you can easily do that by using the default template editor that Blogger provides you, but in most cases it does not support custom templates so you would need to manually change the HTML code yourself.

Advantages:
You can place wider widgets on your sidebar - very useful especially for ads
You can have larger images in your posts
Gives your blog a better look

Changing the width:
Now before you begin doing any changes to your template, it is highly advisable that you first create a backup just in case you are not happy with the final results or have accidentally changed the wrong code.
On your right sidebar in the Blogger Administration panel, head into Template, then on the top right side you should see a button Backup/Restore. Click on that and then click on the orange button that says Download full template.
Now that you have made a backup of your template, you can begin experimenting with the width. Below you will find the three different codes being used for all three parts of your template. When you have opened up the HTML editor for your template, simply search for each of these codes.

Overall blog width:
#outer-wrapper {

Sidebar width:
#sidebar-wrapper {

Posts width:
#main-wrapper {

Below each of these codes, you should find another code that says the following:
width: 500px;
In this case, the 500px is just an example. Yours could be 560px, 400px, etc. Keep in mind, in some cases you may not have px being used but %. Now you may begin changing that value.

Advice:


Always use the preview feature before saving your template and when you are sure you changed everything to your taste, you may finally click on the save button.

Monday, April 20, 2015

How to Optimize Images For SEO Automatically


How to Optimize Images For SEO Automatically


This is done so that the images on your blog page automatically indexed by the search engines like google so you are not bothered by adding it manually (add a description of the <img alt = "description of the image" height = "125" scr = "/ image.png" width = "125" /> when posting images).

The way it can be said to be a hassle. With this automatic way each image has the same description with the title of the picture. Therefore, you should give them appropriate names for each picture to be posted. Why should Optimization For SEO Image Automatically? Because the image on the blog page is one medium that can be used for traffic on search engines because most Internet users are very likely to seek or simply browsing to look at pictures.


Here's how to install automated SEO code in the image Find </ body> tags on your blog template, then copy and paste the code below just above the </ body>

<script type='text/javascript'>
// <! [CDATA [
$(document).ready(function() {
$('img').each(function(){
var $img = $(this);
var filename = $img.attr('src')
$img.attr('alt', filename.substring((filename.lastIndexOf('/'))+1, filename.lastIndexOf('.')));
});
});
//]]>
</script>
<script type='text/javascript'>
// <! [CDATA [
$(document).ready(function() {
$('img').each(function(){
var $img = $(this);
var filename = $img.attr('src')
$img.attr('title', filename.substring((filename.lastIndexOf('/'))+1, filename.lastIndexOf('.')));
});
});
//]]>
</script>
<script type='text/javascript'>
// <! [CDATA [
was scrollwork hours = null;
$(window).scroll(function() {
   var viewportHeight = $(this).height(),
       scrollbarHeight = viewportHeight / $(document).height() * viewportHeight,
       progress = $(this).scrollTop() / ($(document).height() - viewportHeight),
       distance = progress * (viewportHeight - scrollbarHeight) + scrollbarHeight / 2 - $('#scroll').height() / 2;
    $('#scroll')
        .css('top', distance)
        .text(' (' + Math.round(progress * 100) + '%)')
        .fadeIn (100);
    if (scrollTimer !== null) {
        clearTimeout(scrollTimer);
    }
    scrollTimer = setTimeout(function() {
        $('#scroll').fadeOut();
    }, 1500);
});
//]]>
</script>

Next save the template.


Every picture of your blog post in an article automatically will have SEO friendly code. 

Sunday, April 19, 2015

How to Add Sitemap to Blog


How to Add Sitemap to Blogger


Advantage of this is that the widget sitemap blog look more professional. In addition, visitors can also see and search all our blog article easily. Surely it will add value to the blog plus if the visitor opens a specific article on this sitemap widget. Ok just, the way the application is very easy.

Please follow the steps below: First, go to Blogger> Pages> Create a new page> Apply the code below in the HTML tab

<div id="bp_toc">
</ Div>
<script src="https://cdn.rawgit.com/Arlina-Design/redvision/master/sitemap-content.js" type="text/javascript"></script> <script src="/feeds/posts/summary?alt=json-in-script&amp;max-results=9999&amp;callback=loadtoc" type="text/javascript"></script>
 <style scoped="" type="text/css">
#comments {display:none;}
</style>
Then publish the page, click Template> Open the Edit Template> Apply code below just before the </ style>
 /* CSS Full Sitemap */
#bp_toc {background:#ffaaa4;color:#666;margin:0 auto;padding:5px;}
span.toc-note {padding:20px;margin:0 auto;display:block;text-align:center;color:#ffcfcc;font-family:'Open Sans';font-weight:700;text-transform:uppercase;font-size:30px;line-height:normal;}
.toc-header-col1 {padding:10px;background-color:#f5f5f5;width:250px;}
.toc-header-col2 {padding:10px;background-color:#f5f5f5;width:75px;}
.toc-header-col3 {padding:10px;background-color:#f5f5f5;width:125px;}
.toc-header-col1 a:link, .toc-header-col1 a:visited, .toc-header-col2 a:link, .toc-header-col2 a:visited, .toc-header-col3 a:link, .toc-header-col3 a:visited {font-size:13px;
text-decoration:none;color:#aaa;font-family:'Open Sans';font-weight:700;letter-spacing: 0.5px;}
.toc-header-col1 a:hover, .toc-header-col2 a:hover, .toc-header-col3 a:hover {
text-decoration:none;}
.toc-entry-col1, .toc-entry-col2, .toc-entry-col3 {background:#fdfdfd;padding:5px;padding-left:5px;font-size:89%}
.toc-entry-col1 a, .toc-entry-col2 a, .toc-entry-col3 a{color:#666;font-size:13px;}
.toc-entry-col1 a:hover, .toc-entry-col2 a:hover, .toc-entry-col3 a:hover{color:#e76e66;}
#bp_toc table {width:100%;margin:0 auto;counter-reset:rowNumber;}
.toc-entry-col1 {counter-increment:rowNumber;}
#bp_toc table tr td.toc-entry-col1:first-child::before {content: counter(rowNumber);min-width:1em;margin-right:0.5em;}
td.toc-entry-col2 {background:#fafafa;}

Determine the use of fonts and colors to suit your blog. Finally, save the template. If your blog is already there are hundreds of articles, higher is better to limit the page to add style to the first code.

Please specify the value of max-height on top as desired.

Every picture of your blog post in an article automatically will have SEO friendly code. 


<div id="bp_toc" style="max-height:1300px;overflow:scroll;overflow-x:auto;">
</ Div>
<script src="https://cdn.rawgit.com/Arlina-Design/redvision/master/sitemap-content.js" type="text/javascript"></script> <script src="/feeds/posts/summary?alt=json-in-script&max-results=9999&callback=loadtoc" type="text/javascript"></script>
<style scoped="" type="text/css">
#comments {display:none;}
</style>


How to Add a Pop Up Like Box Facebook

How to Add a Pop Up Like Box Facebook


In order to increase visitors to the Facebook page, my friend need to promote a Facebook page to get more like from users who visit your blog.
And no doubt, by adding a popup box like this facebook blogger is one of the best ways to improve a fan of our facebook page mate.
Please follow the following simple steps:

Go to Blogger> Layout> Click to add a gadget then click the HTML / JavaScript> Copy and apply all of the code below in it

<style scoped='' type='text/css'>
#fb-fanbox {display:none;background:rgba(0,0,0,0.9);width:100%;height:100%;position:fixed;top:0;left:0;z-index:99999;-webkit-transform:translateZ(0);}
#fb-boxclose {width:100%;height:100%;-webkit-transform:translateZ(0);}
#fb-boxview {background:#fff;border:8px solid #03a9f4;width:340px;height:230px;position:absolute;top:33%;left:37%;border-radius:3px;}
#fb-closebox {float:right;cursor:pointer;position:absolute;right:-1px;top:-2px;z-index:2;}
#fb-closebox:before {content:"CLOSE";padding:5px 8px;background:#03a9f4;color:#fff;font-weight:normal;font-size:10px;font-family:inherit;}
#fb-boxlink,#fb-boxlink a.visited,#fb-boxlink a,#fb-boxlink a:hover {color:#aaaaaa;font-size:9px;text-decoration:none;text-align:center;padding:5px;}
</style>
<script type='text/javascript'>
// <! [CDATA [
jQuery.cookie = function (key, value, options) {
// Cookie settings
if (arguments.length > 1 && String(value) !== "[object Object]") {
options = jQuery.extend({}, options);
if (value === null || value === undefined) {
options.expires = -1;
}
if (typeof options.expires === 'number') {
var days = options.expires, t = options.expires = new Date();
t.setDate(t.getDate() + days);
}
value = String(value);
return (document.cookie = [
encodeURIComponent(key), '=',
options.raw ? value : encodeURIComponent(value),
options.expires ? '; expires=' + options.expires.toUTCString() : '', // use expires attribute, max-age is not supported by IE
options.path ? '; path=' + options.path : '',
options.domain ? '; domain=' + options.domain : '',
options.secure ? '; secure' : ''
].join(''));
}
// Get the cookie
options = value || {};
var result, decode = options.raw ? function (s) { return s; } : decodeURIComponent;
return (result = new RegExp('(?:^|; )' + encodeURIComponent(key) + '=([^;]*)').exec(document.cookie)) ? decode(result[1]) : null;
};
//]]>
</script>
<script type='text/javascript'>
jQuery(document).ready(function($){
if($.cookie('popup_facebook_box') != 'yes'){
$('#fb-fanbox').delay(3000).fadeIn('fast');
$('#fb-closebox, #fb-boxclose').click(function(){
$('#fb-fanbox').stop().fadeOut('fast');
});
}
$.cookie('popup_facebook_box', 'yes', { path: '/', expires: 7 });
});
</script>
<Div id = "fb-fanbox '>
<div id='fb-boxclose'>
</ Div>
<div id='fb-boxview'>
<div id='fb-closebox'>
</ Div>
<iframe allowtransparency='true' frameborder='0' scrolling='no' src='//www.facebook.com/plugins/likebox.php?
href=https://www.facebook.com/arlinadesign&width=402&height=255&colorscheme=light&show_faces=true&show_border=false&stream=false&header=false'
style='border:none;overflow:hidden;width:339px;height:200px;'></iframe>
</ Div>
</ Div>

javascript

</style>
<script type='text/javascript'>
// <! [CDATA [
jQuery.cookie = function (key, value, options) {
// Cookie settings
if (arguments.length > 1 && String(value) !== "[object Object]") {
options = jQuery.extend({}, options);
if (value === null || value === undefined) {
options.expires = -1;
}
if (typeof options.expires === 'number') {
var days = options.expires, t = options.expires = new Date();
t.setDate(t.getDate() + days);
}
value = String(value);
return (document.cookie = [
encodeURIComponent(key), '=',
options.raw ? value : encodeURIComponent(value),
options.expires ? '; expires=' + options.expires.toUTCString() : '', // use expires attribute, max-age is not supported by IE
options.path ? '; path=' + options.path : '',
options.domain ? '; domain=' + options.domain : '',
options.secure ? '; secure' : ''
].join(''));
}
// Get the cookie
options = value || {};
var result, decode = options.raw ? function (s) { return s; } : decodeURIComponent;
return (result = new RegExp('(?:^|; )' + encodeURIComponent(key) + '=([^;]*)').exec(document.cookie)) ? decode(result[1]) : null;
};
//]]>
</script>
<script type='text/javascript'>
jQuery(document).ready(function($){
if($.cookie('popup_facebook_box') != 'yes'){
$('#fb-fanbox').delay(3000).fadeIn('fast');
$('#fb-closebox, #fb-boxclose').click(function(){
$('#fb-fanbox').stop().fadeOut('fast');
});
}
$.cookie('popup_facebook_box', 'yes', { path: '/', expires: 7 });
});
</script>
<Div id = "fb-fanbox '>
<div id='fb-boxclose'>
</ Div>
<div id='fb-boxview'>
<div id='fb-closebox'>
</ Div>
<iframe allowtransparency='true' frameborder='0' scrolling='no' src='//www.facebook.com/plugins/likebox.php?
href=https://www.facebook.com/ =402&height=255&colorscheme=light&show_faces=true&show_border=false&stream=false&header=false'
style='border:none;overflow:hidden;width:339px;height:200px;'></iframe>
</ Div>
</ Div>
Once added, click Simpan.Setelan: Replace url with the url of the you  facebook page.If you want to bring up a pop-up box like this every time a page is opened blog, please delete the code $ .cookie ('popup_facebook_box ',' yes', {path: '/', expires: 7}); in the above code and disable cookies: false in this script (if installed on the template)
<div id='fb-root'/>
<script>
window.fbAsyncInit = function() {
FB.init ({
AppID: 'CODE-APPLICATION',
status : true, // check login status
cookie : false, // enable cookies to allow the server to access the session
xfbml : true // parse XFBML
});
};
(function() {
var e = document.createElement('script');
e.src = document.location.protocol + '//connect.facebook.net/en_US/all.js';
e.async = true;
document.getElementById('fb-root').appendChild(e);
} ());
</script>

To set the time delay the appearance of pop-up box like this, please set the value of this code .delay (3000)